
Installation
The action file can be downloaded here.To install it, click the link above and save the file to your computer.
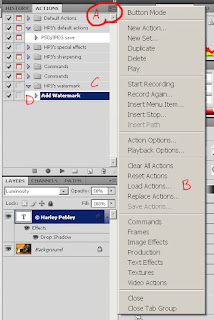 In Photoshop, on the Actions menu (A), select Load actions (B).
In the open file dialog, go to the location the file is saved, select and open the file. You should get a action group called HP3's watermark (C) with an action in it called Add watermark (D).
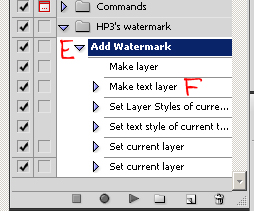 As installed, this action will add watermarks with Your Name Here. To change this, first open an image; any image will do. Then click the arrow next to the action (E); this will list the steps in the action. Double click on the line that says Make text layer (F). Text that says © Your Name Here will be added to the image with the text tool selected. Click on the text and change it to what you want your watermarks to say. Then click on the check box in the tool bar. The action should now be setup for your use. Now, close the image without saving.
Operation
To use the action, open an image, highlight a layer, typically the top one, click on the action and run it. You should get a new layer with your watermark on it. It will be active with the move tool. You may now move and/or change its size as appropriate for this image. When it is where you want, click on the check box in the toolbar. If you want to change any of the settings, you can do it on the new layer in this image. (If you want to always have a different look, then change the settings in the action on the appropriate line that you want to have different. Follow the same pattern as was used to change the name previously during installation.)For a full understanding of how this works and the various settings you can change, be sure to watch Nicole's video.
Go here to see other actions I have shared.
If you have any questions, problems or suggestions, leave a comment and I'll try to address the issue. Have fun!

 Hi. I'm Harley and I'm a photographer. I'm also a lot of other things, but the focus of this site is about images and this aspect of who I am.
2 comments:
This is a great tip, thanks, I've been meaning to learn how to do this. Having the action will really make this simple to implement.
Glad to help out Mike.
Post a Comment