Tuesday, March 23, 2010

Photocamp Utah 2010: Wrap-up

At Photocamp Utah 2010 I presented a workshop demonstrating high-speed photography. As promised, here are my notes (pdf). The video from my presentation can be seen here; the first little bit was taken during setup so it takes a bit before it really gets into the presentation itself. All the videos can be seen here.

Some points of clarification

I was asked a couple questions afterward and thought I'd share them to help clarify what I talked about. If there are other questions, please leave a comment and I'll update this post.

What kind of camera can I use?

For the first setup, any camera that has continuous fire mode and a means of firing a flash will work. Typically this means something with a hotshoe connector on it.

For the second setup, any camera that can be set to a long enough shutter speed to allow you to trip the shutter and then cause the event will work. Since the trigger fires the light which causes the exposure, you just need to be able to have the shutter open when the light goes off.

For the third setup, the camera needs to have a remote shutter release connection.

Can I use the built-in flash?

This will only work for setups one and three and depends on the model of your camera and how much control you have over the flash. My camera does not have a power adjustment for the built-in flash so it won't keep up with drive mode. I think some cameras do have the ability to adjust the power and so they may work.

Will any battery powered flash work?

The key is to have one that has multiple power settings; the lower the power setting the better. I have an older flash that I've used for relatively slow things that works acceptably with it's lowest setting of 1/16th power. It probably would be too slow for things faster, like BBs or bullets.

Regarding setup three, how do I connect the triggers to the camera?

I had a cable that connected the trigger to the shutter release. This will probably involve a custom cable. This was easily done with my camera model since the shutter release plug is a standard size commonly used in audio applications. Some models of cameras have a plug unique to that camera manufacturer. In these cases, you may have to buy a shutter release button and cut the end off to connect the wires to the trigger.

There are also setups where you could use a radio to connect the trigger to the camera. This will require cables to connect the trigger to the radio transmitter. (This is the same as for setup two.) And you'll also need a cable to connect the receiver to the camera's remote shutter release. What this looks like is highly dependent on the radio and camera models.

Setup diagrams

Diagram templates courtesy Kevin Kertz.

Setup 1

Setup 2

Setup 3

Other wrap-up blog articles

In no particular order, here are some other Photocamp Utah wrap-up blog articles. If there are others, let me know about them and I'll add them to the list.

Friday, February 26, 2010

Auto-mode: Yes or No?

The other day, my friend Nicole Young (aka Nicolesy) published a thought provoking article entitled Just Say No to A-U-T-O. In this article, she discusses the results of an informal twitter survey where she asked:
When would a photographer want to use the "Full Auto" mode? (Original here)
(In addition to her article, there are some good comments in response; you might want to check it out.) Her conclusion was:
If you ultimately want to have more creative control of your images then it’s my recommendation to say “no” to the green square.
A mutual friend, Bryan Jones, mentioned in his response that he shoots in Program mode 30% of the time. Now Bryan is a brilliant guy and an expert on things optical. As a post-doc vision researcher and a freelance photojournalist, if anyone is capable of shooting without auto mode, it's him. The amount he used it surprised me enough that I thought a bit about the advantages for an advanced photographer to use auto mode. As I pondered, one reason for a knowledgeable user to use an automatic mode occurred to me.[1] (And there are probably other reasons that haven't occurred to me.)

Those who know me know that in addition to programming and photography, one of the things I enjoy is going fast. Since I also don't like to spend lots of money, the best way to go fast cheaply is on a motorcycle. So, I ride. In my education on the topic, I've read Keith Code's books A Twist of the Wrist and A Twist of the Wrist 2.

As part of Keith's instruction, he introduces the concept of attention cost. The theory is we have a fixed amount of attention. Minor distractions reduce the amount we have to devote to important tasks. For example, as it relates to motorcycle riding, an air leak in your helmet will cause a tickle on your cheek, diverting attention away from the more critical shifting, braking, cornering and accelerating tasks. Fix the air leak and you will go faster around the track because you can pay more attention to the tasks that are important for speed.

I think this is directly applicable to photography and the question of whether to use auto mode or not. What is important to your shot? Where should you spend your limited attention?


© Nicole S. Young - All Rights Reserved
Used with permission
For the stock and creative shooting Nicole does, things controlled by the various manual modes are critical. They are vital components of making the shot. If something unrelated to these things, such as composition or lighting, is not exactly right, she can adjust and retake the shot. Auto mode simply does not give her the technical control she needs.


© Bryan W. Jones
Creative Commons License
For the photojournalism shooting Bryan does, I doubt things like ISO, f/stop and shutter speed are as important as they are to Nicole. On the other hand, the situational awareness to anticipate shots, move into position, frame and snap the shutter to get the once in a lifetime event are critical. For his style of shooting, auto mode eliminates distractions and allows him to focus on capturing the moment.

My conclusion: automatic mode has its place. The key is to know how to use all modes of your camera, evaluate each situation you're shooting in to determine what's most important, and then choose the mode that's applicable.

1. To be clear, I have not talked with Bryan about this. I don't know his reasons. It's just his doing it that caused me to think about why one might do it in general.

Saturday, January 30, 2010

Photochallenge 2010: Week 5

The second month's topic for the yearly photochallenge is Natural Landscape. In this context, "Natural" is defined as having no man made objects in the scene. I live in a beautiful area of the country, with gorgeous mountains on all sides and two large lakes nearby. However, being a fairly built up metropolitan area, it does take a bit of a drive to get to locations without evidence of human habitation. I may have to bend the concept of landscape at times to make some images this month.

In any case, my wife and I took a drive this afternoon with the intent of finding a good spot with the evening's sunset for this week's challenge. I planned to at least start with an image that didn't push the definitions too much. Heading out of town, we planned a quick errand. Unfortunately, it took much longer than anticipated and we didn't make it out of town until after sunset had already started.

A while later, as she drove down a back road, I watched a barely visible mountain range slide by my window with city lights illuminating the clouds from the other side. Wondering what the sensor might see, I picked up the camera and clicked. Fifteen seconds later I had nothing but a colorful blur. Hmmm. Looked like possibly some potential.
I had an idea for a composite image, but needed some additional raw material to work with. So much for a standard landscape shot. With peaked interest, I asked her to pull over at the next wide spot. I got out, set up the tripod and made some more exposures. Nothing too spectacular, in and of themselves, but I thought they might work well enough for what I had in mind.
When we got home, I loaded the images into the computer and went to work. With some experimentation, this image finally emerged. It's not what I had visualized; it has a completely different feel to it, but I like it more.
Hidden City Lights

After I finished this first version, I decided to go back and edit the images again to attempt what I had pre-visualized. It was much easier to do and my wife actually prefers it over the previous one.
Landscape Dream

So, two very different final products made from the same two base images. Which do you prefer?

Tuesday, January 26, 2010

How to watermark your image

My friend Nicole Young (aka Nicolesy) posted a great video tip the other day on her blog: Two minute tip: Watermarking Your Images. Additionally, one of her photos on twitter has quite a discussion on the pros and cons of adding a watermark. Inspired by these two items, I created a Photoshop action to automate this task.

Installation

The action file can be downloaded here.

To install it, click the link above and save the file to your computer.

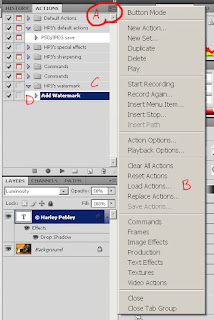
In Photoshop, on the Actions menu (A), select Load actions (B).

In the open file dialog, go to the location the file is saved, select and open the file. You should get a action group called HP3's watermark (C) with an action in it called Add watermark (D).


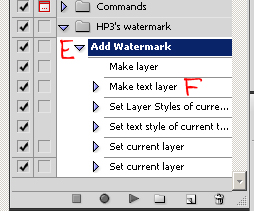
As installed, this action will add watermarks with Your Name Here. To change this, first open an image; any image will do. Then click the arrow next to the action (E); this will list the steps in the action. Double click on the line that says Make text layer (F). Text that says © Your Name Here will be added to the image with the text tool selected. Click on the text and change it to what you want your watermarks to say. Then click on the check box in the tool bar. The action should now be setup for your use. Now, close the image without saving.

Operation

To use the action, open an image, highlight a layer, typically the top one, click on the action and run it. You should get a new layer with your watermark on it. It will be active with the move tool. You may now move and/or change its size as appropriate for this image. When it is where you want, click on the check box in the toolbar. If you want to change any of the settings, you can do it on the new layer in this image. (If you want to always have a different look, then change the settings in the action on the appropriate line that you want to have different. Follow the same pattern as was used to change the name previously during installation.)

For a full understanding of how this works and the various settings you can change, be sure to watch Nicole's video.

Go here to see other actions I have shared.

If you have any questions, problems or suggestions, leave a comment and I'll try to address the issue. Have fun!

Wednesday, January 20, 2010

Photocamp Utah 2010: Inexpensive High-speed Photography

Apple splash
Two months from today, over 300 photographers will descend on the Miller Conference Center for a day-long conference filled with workshops, networking, learning and fun. It's the second annual Photocamp Utah event. In spite of a larger venue with room for 50% more people and a technical problem just before registration started, tickets sold out in six hours.

I will present a workshop again this year. To keep with last year's McGyver-ish theme of doing things cheap, I will talk about the basics of high-speed photography and how to do it with equipment most photographers already have or can get inexpensively, such as the HiViz kits I recently built. A live demonstration will illustrate the points and show how to set things up for a shot like the one above.

I hope to see you there. If you see me, be sure to say "Hi".

Tuesday, January 12, 2010

Sometimes you take what you can get

Path to the sun
Around here at this time of year temperature inversions set in. The valley stays cold while warm air stays at higher elevations. A lack of vertical air movement results in really bad air quality. This causes a heavy layer of mixed smog and fog, particularly noticeable in the mornings and evenings. While very bad for health, it provides some spectacular sunrises and sunset.

Over the course of the last several mornings, I've noticed this layer of air makes conditions for some potentially interesting images. I can see how it could be used to separate foreground elements from background elements with a nice layering effect. I thought the river bottoms at the edge of town might provide some nice foreground elements with the mountains in the far background. So, last night I decided I'd get up early and head down there on the way to work. I checked the time for sunrise, set the alarm and headed to bed.

When I got up this morning, the wind was blowing. Hmm. When I looked out, sure enough, the haze that has been the norm was gone; blown away in front of an approaching front. I decided I'd head out in spite of the changes and see what I could get anyway. The image at the top is what I came away with. Not at all what I pre-visualized, but an image I like none the less. Sometimes you just have to take what life gives you and make the most of it.

Saturday, January 9, 2010

Photochallenge 2010: Week 2

I've decided to participate in this year's photochallenge organized by Trevor Carpenter and Jeremy Brooks over at PhotoChallnege.org. This year the challenge is to post one image a week related to a topic that changes every four weeks. Last week, with only two days in it, was too short for me to get anything up; I didn't actually find out about it until Saturday. So this week is my first entry.
Speak, Lord, for Your servant is listening.
Resolution is first topic of the year. One of my life goals is to spend time on a daily basis in Bible reading and prayer. I must confess I don't do too well keeping a daily schedule with anything from brushing my teeth to working out to time with God. (This is the primary reason I didn't do last year's challenge. It was a daily challenge and I knew it'd be too much.) In any case, I plan on doing better than last year in setting aside time to listen to what God has to tell me.

Wednesday, August 26, 2009

Review of HiViz kits and initial results

I've always been intrigued with capturing images of things that we don't typically see. One way this is manifested is with freeze shots like splashes, water drops and light bulbs burning out. In the past I've done this using continuous drive mode, strobes and semi-random chance. Wanting to have additional control, last year I purchased a sound trigger, light gate and delay timer kits from hiviz.com. These types of projects being the somewhat low priority that they are, I finally finished them a couple weeks ago.

Since I have built many electronics kits in the past, I wasn't intimidated by the projects at all, but I wouldn't suggest them if you've never built a kit before. The kit is basically all the components you'll need with some hookup wire and a couple sheets of paper with schematics and directions. For an initial, temporary build, you can buy breadboards from HiViz and they have detailed pictures on their web site of the kits built on the breadboards. This allows someone not familiar with schematic reading to assemble them, but they're not a very permanent solution. In addition to the kits, I purchased a couple perf boards from Radio Shack and some cases and other miscellaneous items from Ra-Elco to finish the kits off.

In the end, this is what the completed kits look like:

(Click images to see larger view.)

I won't bore you with the specific build details, since there's nothing too exciting about the construction of the projects. But I will say, the timer was the most complicated with the highest parts count and the sound trigger was the simplest with the lowest parts count. Here's what the inside of the light gate looks like:

(Click images to see larger view.)

Probably the most interesting thing is I used 1/8" jacks for all three outputs and the delay unit's input. The Cactus wireless system I have to fire my strobes has one of these in the transmitter. This allows me to use standard audio patch cables to connect the output of the triggers either directly to the wireless transmitter or to the input of the delay unit which in turn can be connected to the transmitter. The sensors for the light gate and sound pick-up each have different types of connectors so it's impossible to mix them up or connect them incorrectly.

Another feature that's not standard with the kits is multiple resolutions on the timer. The delay kit comes with several different values of capacitors that control the maximum time for the delay. The idea presented in the kit is you decide which one you want to use and build your kit with only one of the capacitors. I decided to put a three way switch in so I can switch between them easily. With the values I used, I can switch between a maximum time of 10 milliseconds, 100 milliseconds or 1 second (1000 ms). I don't expect to probably ever need a 1 second delay, but it's there if I do find I need it.

In initial testing, they seem to work pretty well. All three worked correctly the first time I turned them on. The only real problem I've had is the sensitivity and timer delay adjustments don't seem to be active until about 1/3 of the way through the sweep of the potentiometer. After that they seem to work as expected. The panel mount ones I used are rated the same as what came with the kit so I'm not sure exactly where the problem lies. I have a couple ideas, but they work well enough I'll probably never dig into the reason; I'm more interested in using them than tracking down this anomaly.

My first test shots were with the sound trigger and delay timer. I setup my lights and camera in my "studio" (aka workshop, basement, storage) and plugged everything together. I set my camera to manual mode and took several test shots to dial in an acceptable exposure and then put it in bulb mode and put my remote release on it. Then I loaded my Airsoft gun, turned off the overhead lights, tripped the shutter and shot some balloons. In total, ten balloons gave up their short lives as I got the trigger sensitivity and delay dialed in. In the end, the last three all gave me very similar results. This proves to me I'll be able to get the consistency in these shots that I've been looking for.

Here are a couple of the better test shots. I'm looking forward to being able to spend some time getting some better shots setup and playing with these a lot more.

(Click images to see larger view.)

Thursday, August 20, 2009

How to make a surreal faux HDR image

Introduction

I recently ran across this Russell Brown PhotoShop tutorial wherein he presents a technique to make what he calls a Faux HDR image. This doesn't really have much to do with HDR other than taking a single image and giving it a surrealistic, over-the-top, tone-mapped HDR look. It does not take a scene and get more dynamic range out of it as is typical with HDR. It does take a scene with a compressed dynamic range and expands it to make it brighter while at the same time it boosts color brightness and saturation. You can go watch the video here or, if you're like me and aren't a fan of video tutorials, you can read about it below.

Best types of images

This technique works best on images that are not blown out but where the detail is tightly compressed. Typically this happens when a scene is exposed for a bright section, so it's not over exposed, but has lots of dark areas causing important detail to be hidden in the shadows. For the purposes of this tutorial, I'll be using this example image I took on a recent Photowalking Utah event.


As you can see from the histogram, this image has a large bump on the left and a smaller bump on the right indicating a lot of dark and light areas whereas the middle area does not have much going on. The dark areas are not underexposed nor are the light areas overexposed. This can be seen by the two triangles in the top left and right corners. The one on the left will change color when there are details lost in the shadows and the one on the right when the brightest areas are overexposed.


For comparison, here is a similar image that does not work well. It is exposed for the darker areas as evidenced by the wider and smoother bump on the left side. Unfortunately, this causes the highlights to be overexposed and the cloud detail to be lost as seen by the sharp spike on the very left side.

In Camera Raw

The majority of the work will be done in Camera Raw, prior to going into PhotoShop. First, open your image and verify there are no blown out details. As intimated earlier, look on the histogram for images without spikes going off either edge. If you click on the triangles at the top right and left corners of the histogram, Camera Raw will change all the overexposed sections to red and the underexposed sections to blue as a means of highlighting the areas that have lost detail.

Now to get into the main changes. We're going to be manipulating primarily the Exposure, Recovery, Fill Light, Blacks, Clarity and Vibrance sliders. We'll start at the top of the list and work our way down. When we get to the bottom, we'll evaluate the image and possibly go back to the top to make some fine tuning adjustments.

Exposure

The exposure will typically need to be adjusted. If on the histogram, the dark area is larger, such as on this example image, then typically the exposure will need to be increased. On the other hand, if the bright area is larger, then it'll need to be decreased. On this image, if I increase it at all I'll start blowing out details in the bright areas, so for now I'll leave it at 0.

Recovery

Recovery pulls the brighter parts of the image down and gives us some headroom on the right side of the histogram to additional changes. This technique typically works best with this set the maximum, so that's where I'll put it for now.

Fill Light

Fill Light brightens the dark areas without blowing out the highlights. Again, the images that work best with this technique usually like this set to the maximum.

Now that we're about half-way through this first part, we can see our image is quite a bit brighter, but has sort of a flat appearance to it.


We can see in the histogram the data is spread apart rather than being bunched up on the two sides. The remaining steps in this section will help give the image some more depth.

Blacks

Now to get rid of that flat look, we're going to increase the Blacks slider. Adjust it so the dark regions are just starting to clip, as indicated by the blue highlights that Camera Raw shows us. For this image, a value around 40 works well.

Clarity and Vibrance

To get that surrealistic look characteristic of overly tone-mapped HDR images, we're now going to slide both the Clarity and Vibrance sliders all the way to their maximum values.

Fine tune adjustments

Now that we have all the basic adjustments done, we need to evaluate where we are. At this point, this image is still pretty dark. To lighten it, I go back to the Exposure slider and find I can now push it quite a bit. In fact, I can increase the exposure by 2.5 stops without clipping. If I increase it more, then I start blowing out my sky which I don't want to do. By leaving detail in the sky, even though it's not too visible at this point, I'll have something to work with later to improve it.

Now we're done with the controls on the first panel.


The next step is to do some adjustments on individual colors. To do this we go to the HSL / Grayscale tab.


And once there, we click on the Luminance tab.


These controls allow us to change the brightness levels of various color groups. What we change and the amount we change it will vary from image to image. On this image, I find that decreasing the Blues and increasing the Purples significantly helps my sky. Based on this discovery, I go over to the Hue tab and find I can help the sky some more by sliding the Purples and Oranges over to the right to around 65. This brings out the colors in the sky and flowers even more. This is an area where experimentation on each image can yield dramatic results.

If you so desire, you can crop the image and apply a vignette. The cropping tool in the top toolbar works well to remove those parts of the image you don't want and the vignette control on the Lens Correction tab allows you to highlight the center of the image. I choose not to do that on this particular one.

Open in Photoshop

We're now done with our edits in Camera Raw. Just prior to opening the image, make sure the color depth is set correctly and smart objects is enabled. To do this, click on the label that is centered at the bottom of the Camera Raw screen containing information about the color mode, bit depth, image size and resolution. This will open a dialog. Make sure the Depth is set to 16 bits/channel and the checkbox for smart objects at the bottom is checked. Close the dialog and then click the Open Object button. Doing this will ensure there is no loss of color information in the transfer to Photoshop and the background will be configured as a smart object so edits will be non-destructive.

There are many things that can be done to the image at this point. One of the more common ones for this type of image is to adjust the Shadows and Highlights found on the Image / Adjustments menu. Quite often this type of image can be further enhanced by selectively adjusting contrast in different regions of the picture. I found on this particular one this didn't help, but it has on others.

Sharpening is another thing that typically enhances most images. The use of either Smart sharpen... on the Filter / Sharpen menu or my High-pass sharpening action can be used. The Smart sharpen tool can give a very edgy look by pushing the controls to high values. My action will give a less edgy look.

After some tweaks to the sky, this is my final version of this image.

And here are a couple of other images processed with this technique.
Albion morning

Red, White and Blue

Summary

In closing, here is an outline of the steps covered above.
  • Camera Raw
    1. Exposure: over or under as dictated by image.
    2. Recovery: typically 100%
    3. Fill Light: typically 100%
    4. Blacks: typically 30-50%
    5. Clarity: typically 100%
    6. Vibrance: typically 100%
    7. HSL / Luminance: as needed for iamge
  • Photoshop
    1. Image / Adjustments / Shadows and Highlights: as needed
    2. Filter / Sharpen / Smart sharpen: as needed
    3. Anything else: as desired

Monday, August 10, 2009

Photoshop CS4 action: High-pass sharpening

My good friend and fellow photographer Rich Legg wrote an article almost two years ago about how to use the high-pass filter to sharpen an image. I made a mental note of it in passing, but didn't do much with it since I was using Paint Shop Pro at the time and it has a built-in method to do this in one step. When I switched to Photoshop several months ago, I went back to his article to remind myself how to do it.

In his article, Rich outlines the four step process:
  1. Copy the layer you want to sharpen.
  2. Apply a high pass filter to it.
  3. Set the radius to around 4.
  4. Set the blending mode to Soft light for a mild sharpen or Overlay for a stronger effect.
Simple as this is, I created an action to make it a single operation. The action file can be downloaded here.

To use it, click the link above and save the file to your computer. In Photoshop, on the Actions menu, select Load actions. In the open file dialog, go to the location the file is saved, select and open the file. You should get a action group called HP3's sharpening with two actions in it, one for strong sharpening and one for mild sharpening.

To use them, open an image, highlight the background layer, click on one of the two actions and run it. You should get a new layer and the high-pass filter radius dialog. Adjust the radius as desired and click OK. You should see your image sharpened. You can enable and disable the layer to see the effect of the action.

A couple notes:
  1. The radius value of 4 that Rich recommends for the filter is image dependent. Use higher values for more sharpening and/or a larger image. Use a smaller value for less sharpening or a smaller image. The actions I've recorded use a value of 5 as a default since I've found that seems to work better for me with the types of images I typically work with. If you set this too large, you'll get a light halo effect around the edges of subjects in your image.
  2. I've set the Opacity of the sharpening layer to 50% as a starting point. Again, this seems to be a good starting point for me on the images I edit. Like the radius value, it can also be increased for more sharpening or decreased for less.
If you have any questions, problems or suggestions, leave a comment and I'll try to address the issue. Have fun!