Saturday, January 9, 2010

Photochallenge 2010: Week 2

I've decided to participate in this year's photochallenge organized by Trevor Carpenter and Jeremy Brooks over at PhotoChallnege.org. This year the challenge is to post one image a week related to a topic that changes every four weeks. Last week, with only two days in it, was too short for me to get anything up; I didn't actually find out about it until Saturday. So this week is my first entry.
Speak, Lord, for Your servant is listening.
Resolution is first topic of the year. One of my life goals is to spend time on a daily basis in Bible reading and prayer. I must confess I don't do too well keeping a daily schedule with anything from brushing my teeth to working out to time with God. (This is the primary reason I didn't do last year's challenge. It was a daily challenge and I knew it'd be too much.) In any case, I plan on doing better than last year in setting aside time to listen to what God has to tell me.

Wednesday, August 26, 2009

Review of HiViz kits and initial results

I've always been intrigued with capturing images of things that we don't typically see. One way this is manifested is with freeze shots like splashes, water drops and light bulbs burning out. In the past I've done this using continuous drive mode, strobes and semi-random chance. Wanting to have additional control, last year I purchased a sound trigger, light gate and delay timer kits from hiviz.com. These types of projects being the somewhat low priority that they are, I finally finished them a couple weeks ago.

Since I have built many electronics kits in the past, I wasn't intimidated by the projects at all, but I wouldn't suggest them if you've never built a kit before. The kit is basically all the components you'll need with some hookup wire and a couple sheets of paper with schematics and directions. For an initial, temporary build, you can buy breadboards from HiViz and they have detailed pictures on their web site of the kits built on the breadboards. This allows someone not familiar with schematic reading to assemble them, but they're not a very permanent solution. In addition to the kits, I purchased a couple perf boards from Radio Shack and some cases and other miscellaneous items from Ra-Elco to finish the kits off.

In the end, this is what the completed kits look like:

(Click images to see larger view.)

I won't bore you with the specific build details, since there's nothing too exciting about the construction of the projects. But I will say, the timer was the most complicated with the highest parts count and the sound trigger was the simplest with the lowest parts count. Here's what the inside of the light gate looks like:

(Click images to see larger view.)

Probably the most interesting thing is I used 1/8" jacks for all three outputs and the delay unit's input. The Cactus wireless system I have to fire my strobes has one of these in the transmitter. This allows me to use standard audio patch cables to connect the output of the triggers either directly to the wireless transmitter or to the input of the delay unit which in turn can be connected to the transmitter. The sensors for the light gate and sound pick-up each have different types of connectors so it's impossible to mix them up or connect them incorrectly.

Another feature that's not standard with the kits is multiple resolutions on the timer. The delay kit comes with several different values of capacitors that control the maximum time for the delay. The idea presented in the kit is you decide which one you want to use and build your kit with only one of the capacitors. I decided to put a three way switch in so I can switch between them easily. With the values I used, I can switch between a maximum time of 10 milliseconds, 100 milliseconds or 1 second (1000 ms). I don't expect to probably ever need a 1 second delay, but it's there if I do find I need it.

In initial testing, they seem to work pretty well. All three worked correctly the first time I turned them on. The only real problem I've had is the sensitivity and timer delay adjustments don't seem to be active until about 1/3 of the way through the sweep of the potentiometer. After that they seem to work as expected. The panel mount ones I used are rated the same as what came with the kit so I'm not sure exactly where the problem lies. I have a couple ideas, but they work well enough I'll probably never dig into the reason; I'm more interested in using them than tracking down this anomaly.

My first test shots were with the sound trigger and delay timer. I setup my lights and camera in my "studio" (aka workshop, basement, storage) and plugged everything together. I set my camera to manual mode and took several test shots to dial in an acceptable exposure and then put it in bulb mode and put my remote release on it. Then I loaded my Airsoft gun, turned off the overhead lights, tripped the shutter and shot some balloons. In total, ten balloons gave up their short lives as I got the trigger sensitivity and delay dialed in. In the end, the last three all gave me very similar results. This proves to me I'll be able to get the consistency in these shots that I've been looking for.

Here are a couple of the better test shots. I'm looking forward to being able to spend some time getting some better shots setup and playing with these a lot more.

(Click images to see larger view.)

Thursday, August 20, 2009

How to make a surreal faux HDR image

Introduction

I recently ran across this Russell Brown PhotoShop tutorial wherein he presents a technique to make what he calls a Faux HDR image. This doesn't really have much to do with HDR other than taking a single image and giving it a surrealistic, over-the-top, tone-mapped HDR look. It does not take a scene and get more dynamic range out of it as is typical with HDR. It does take a scene with a compressed dynamic range and expands it to make it brighter while at the same time it boosts color brightness and saturation. You can go watch the video here or, if you're like me and aren't a fan of video tutorials, you can read about it below.

Best types of images

This technique works best on images that are not blown out but where the detail is tightly compressed. Typically this happens when a scene is exposed for a bright section, so it's not over exposed, but has lots of dark areas causing important detail to be hidden in the shadows. For the purposes of this tutorial, I'll be using this example image I took on a recent Photowalking Utah event.


As you can see from the histogram, this image has a large bump on the left and a smaller bump on the right indicating a lot of dark and light areas whereas the middle area does not have much going on. The dark areas are not underexposed nor are the light areas overexposed. This can be seen by the two triangles in the top left and right corners. The one on the left will change color when there are details lost in the shadows and the one on the right when the brightest areas are overexposed.


For comparison, here is a similar image that does not work well. It is exposed for the darker areas as evidenced by the wider and smoother bump on the left side. Unfortunately, this causes the highlights to be overexposed and the cloud detail to be lost as seen by the sharp spike on the very left side.

In Camera Raw

The majority of the work will be done in Camera Raw, prior to going into PhotoShop. First, open your image and verify there are no blown out details. As intimated earlier, look on the histogram for images without spikes going off either edge. If you click on the triangles at the top right and left corners of the histogram, Camera Raw will change all the overexposed sections to red and the underexposed sections to blue as a means of highlighting the areas that have lost detail.

Now to get into the main changes. We're going to be manipulating primarily the Exposure, Recovery, Fill Light, Blacks, Clarity and Vibrance sliders. We'll start at the top of the list and work our way down. When we get to the bottom, we'll evaluate the image and possibly go back to the top to make some fine tuning adjustments.

Exposure

The exposure will typically need to be adjusted. If on the histogram, the dark area is larger, such as on this example image, then typically the exposure will need to be increased. On the other hand, if the bright area is larger, then it'll need to be decreased. On this image, if I increase it at all I'll start blowing out details in the bright areas, so for now I'll leave it at 0.

Recovery

Recovery pulls the brighter parts of the image down and gives us some headroom on the right side of the histogram to additional changes. This technique typically works best with this set the maximum, so that's where I'll put it for now.

Fill Light

Fill Light brightens the dark areas without blowing out the highlights. Again, the images that work best with this technique usually like this set to the maximum.

Now that we're about half-way through this first part, we can see our image is quite a bit brighter, but has sort of a flat appearance to it.


We can see in the histogram the data is spread apart rather than being bunched up on the two sides. The remaining steps in this section will help give the image some more depth.

Blacks

Now to get rid of that flat look, we're going to increase the Blacks slider. Adjust it so the dark regions are just starting to clip, as indicated by the blue highlights that Camera Raw shows us. For this image, a value around 40 works well.

Clarity and Vibrance

To get that surrealistic look characteristic of overly tone-mapped HDR images, we're now going to slide both the Clarity and Vibrance sliders all the way to their maximum values.

Fine tune adjustments

Now that we have all the basic adjustments done, we need to evaluate where we are. At this point, this image is still pretty dark. To lighten it, I go back to the Exposure slider and find I can now push it quite a bit. In fact, I can increase the exposure by 2.5 stops without clipping. If I increase it more, then I start blowing out my sky which I don't want to do. By leaving detail in the sky, even though it's not too visible at this point, I'll have something to work with later to improve it.

Now we're done with the controls on the first panel.


The next step is to do some adjustments on individual colors. To do this we go to the HSL / Grayscale tab.


And once there, we click on the Luminance tab.


These controls allow us to change the brightness levels of various color groups. What we change and the amount we change it will vary from image to image. On this image, I find that decreasing the Blues and increasing the Purples significantly helps my sky. Based on this discovery, I go over to the Hue tab and find I can help the sky some more by sliding the Purples and Oranges over to the right to around 65. This brings out the colors in the sky and flowers even more. This is an area where experimentation on each image can yield dramatic results.

If you so desire, you can crop the image and apply a vignette. The cropping tool in the top toolbar works well to remove those parts of the image you don't want and the vignette control on the Lens Correction tab allows you to highlight the center of the image. I choose not to do that on this particular one.

Open in Photoshop

We're now done with our edits in Camera Raw. Just prior to opening the image, make sure the color depth is set correctly and smart objects is enabled. To do this, click on the label that is centered at the bottom of the Camera Raw screen containing information about the color mode, bit depth, image size and resolution. This will open a dialog. Make sure the Depth is set to 16 bits/channel and the checkbox for smart objects at the bottom is checked. Close the dialog and then click the Open Object button. Doing this will ensure there is no loss of color information in the transfer to Photoshop and the background will be configured as a smart object so edits will be non-destructive.

There are many things that can be done to the image at this point. One of the more common ones for this type of image is to adjust the Shadows and Highlights found on the Image / Adjustments menu. Quite often this type of image can be further enhanced by selectively adjusting contrast in different regions of the picture. I found on this particular one this didn't help, but it has on others.

Sharpening is another thing that typically enhances most images. The use of either Smart sharpen... on the Filter / Sharpen menu or my High-pass sharpening action can be used. The Smart sharpen tool can give a very edgy look by pushing the controls to high values. My action will give a less edgy look.

After some tweaks to the sky, this is my final version of this image.

And here are a couple of other images processed with this technique.
Albion morning

Red, White and Blue

Summary

In closing, here is an outline of the steps covered above.
  • Camera Raw
    1. Exposure: over or under as dictated by image.
    2. Recovery: typically 100%
    3. Fill Light: typically 100%
    4. Blacks: typically 30-50%
    5. Clarity: typically 100%
    6. Vibrance: typically 100%
    7. HSL / Luminance: as needed for iamge
  • Photoshop
    1. Image / Adjustments / Shadows and Highlights: as needed
    2. Filter / Sharpen / Smart sharpen: as needed
    3. Anything else: as desired

Monday, August 10, 2009

Photoshop CS4 action: High-pass sharpening

My good friend and fellow photographer Rich Legg wrote an article almost two years ago about how to use the high-pass filter to sharpen an image. I made a mental note of it in passing, but didn't do much with it since I was using Paint Shop Pro at the time and it has a built-in method to do this in one step. When I switched to Photoshop several months ago, I went back to his article to remind myself how to do it.

In his article, Rich outlines the four step process:
  1. Copy the layer you want to sharpen.
  2. Apply a high pass filter to it.
  3. Set the radius to around 4.
  4. Set the blending mode to Soft light for a mild sharpen or Overlay for a stronger effect.
Simple as this is, I created an action to make it a single operation. The action file can be downloaded here.

To use it, click the link above and save the file to your computer. In Photoshop, on the Actions menu, select Load actions. In the open file dialog, go to the location the file is saved, select and open the file. You should get a action group called HP3's sharpening with two actions in it, one for strong sharpening and one for mild sharpening.

To use them, open an image, highlight the background layer, click on one of the two actions and run it. You should get a new layer and the high-pass filter radius dialog. Adjust the radius as desired and click OK. You should see your image sharpened. You can enable and disable the layer to see the effect of the action.

A couple notes:
  1. The radius value of 4 that Rich recommends for the filter is image dependent. Use higher values for more sharpening and/or a larger image. Use a smaller value for less sharpening or a smaller image. The actions I've recorded use a value of 5 as a default since I've found that seems to work better for me with the types of images I typically work with. If you set this too large, you'll get a light halo effect around the edges of subjects in your image.
  2. I've set the Opacity of the sharpening layer to 50% as a starting point. Again, this seems to be a good starting point for me on the images I edit. Like the radius value, it can also be increased for more sharpening or decreased for less.
If you have any questions, problems or suggestions, leave a comment and I'll try to address the issue. Have fun!

Monday, June 15, 2009

Photo-op: British Field Day

1952 MG YB

I made this shot of a 1952 MG YB at last year's British Field Day here in Salt Lake City. (Click on the image to see the all the photos from last year.) This is a cool event showcasing British cars and motorcycles that is held in Liberty Park. It's a great time to see some unique cars and bikes in superb shape. In addition to the standard static displays, they setup a short course participants can run their vehicles through against the clock, affording an opportunity to get some action shots that aren't available at most car shows.

This year's event is this Saturday, June 20th. More information can be found on the British Field Day website.

Thursday, June 11, 2009

Hill Air Force Base Open House

Due to a number of reasons, I was unable to make it up to the Open House at Hill Air Force Base last weekend. Fortunately, a number of other people I know were able to make it and share the photos they made. (Listed in alphabetical order.) Click on the photos below to see more by the same photographer.

Aaron Barker got this P-51:
P-51 Mustang

Skyler Call caught the Thunderbirds in action:
Thunderbird F-16

Matt Freestone has a number of human shots on his blog:
parachute jumpers

Nathan Marx made a number of images of older planes:
old plane

Ratish Naroor also shows the human side of the Thunderbirds:
Thunderbird team member and F-16

Ruben Schoenefeld got this Canadair CT-133 Silver Star 3:
Canadair CT-133 Silver Star 3

The Standard-Examiner has a slide show of images made by Djamla Grossman, including this one of a Thunderbird's F-16 preparing for the show:
F-16 Thunderbird

Scott Stringham caught this F-22 with water condensing in the pressure wave:
F-22

Thanks everyone for sharing your images.

Tuesday, June 9, 2009

Photowalking Utah: Star party

Star trails

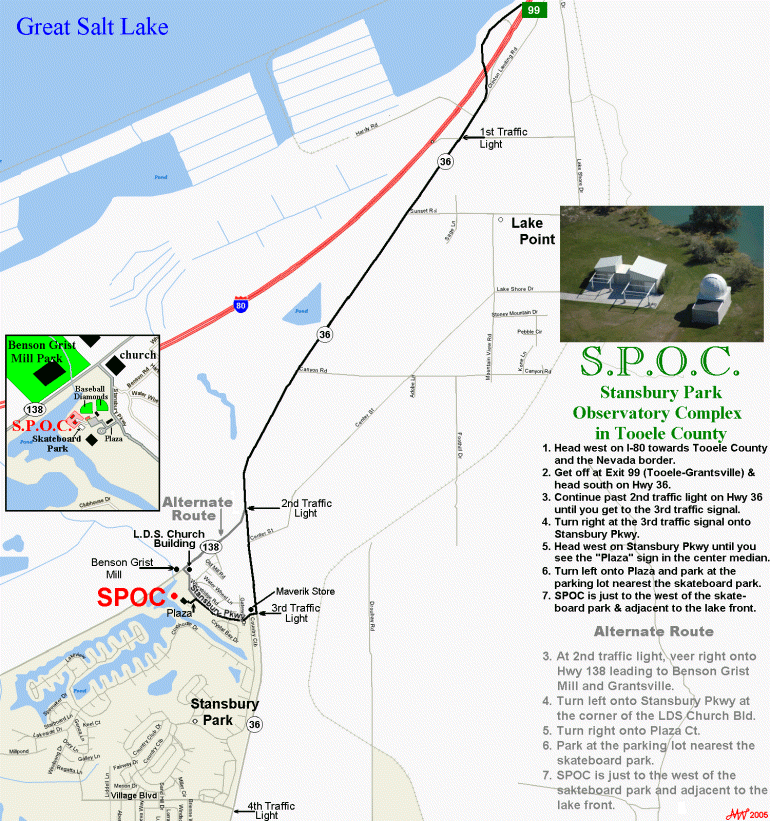
The Salt Lake Astronomical Society will be hosting a Star Party at the Stansbury Park Observatory on the evening of Saturday June 13th, 2009. At this event, members of SLAS, and other enthusiasts, bring out their telescopes for the public to look through in addition to the telescopes at the observatory. You will be able to check out Saturn's rings or Jupiter's moons while you wait for your star trails bulb shot to complete.

We will be meeting out there at 9:00pm, where we will be introduced to the Vice President of the SLAS. This should also give us enough time so we can be set up by 9:30. Around 10:00pm is about when the stars should really start to shine. Typically the star parties last until 11:00pm, but the ending time for this is still TDB.

You can find Maps to the Observatory on SLAS's website:
slas.us/maps/SPOCMAP.HTM
slas.us/images/MAPS/SPOC_Map.gif (printable)

Once again, the details:
  • Stansbury Park Observatory (Not Island)
  • June 13th (Saturday)
  • 9:00pm

Weather Permitting

Follow the discussion on this Flickr thread.

Monday, June 1, 2009

Photo-op: Open house at Hill AFB

SR-71
SR-71
Originally uploaded by hpebley3


The last time I made it to an Air Force open house was way back in the 80's when the Blackbirds were still commissioned and making appearances. It was very cool to have one of those zoom past your head; too bad they've all been mothballed. The image above is a low-res scan of a print of my good friend Neil and his two boys when we went to an open house at Mather AFB in Sacramento, CA.

Anyway, just wanted to let anyone interested that there's going to be an Open House this weekend, June 6th and 7th at Hill Air Force Base starting at 0800. The air show is scheduled to run from 1030-1730. With a program as varied as the Thunderbirds, F-16s, F-18s, P-51s, MiG-21s, skydivers and hang gliders, I'm expecting some interesting things to photograph. UTA will have a shuttle running from the Clearfield Frontrunner station to the base for $2 round trip cost.

For more information: Official Hill AFB Open House site

Tuesday, May 5, 2009

Photowalking the Spiral Jetty

Spiral Jetty
Spiral Jetty Glowing
Originally uploaded by wibbet_


Spiral Jetty Beneath the Full Moon
Originally uploaded by cuibel


The Spiral Jetty is the place to be in May. Having been on my list of places to visit for quite awhile, I'm excited to head up there!

There are two events that I'm aware of: May 9th and May 16th.

The first is organized by Charles Uibel and is a full moon night event. We'll meet at Golden Spike Historic Site at 6:00 pm and head out from there. It will go as late as you want to stay. Several people are planning on camping to be able to get the moonset later in the night and sunrise the next morning. More information and discussion can be found on this event page.

The second is organized by Photowalking Utah. The plan is to meet in the parking lot of the Golden Spike National Historic Site at 12:00 noon on Saturday, May 16. Since they charge $7/car or $3/individual, carpooling is strongly encouraged. They have asked that any photographs we take be for private use and not used commercially. More information and discussion can be found on this Flickr discussion.

The driving of the spike takes place at 1:00pm. In addition to the reenactment, there are a number of driving tours with interesting geographical features such as the Chinese Arch.

When we're done at the Spike, we will head out to the Spiral Jetty. It takes about 45 minutes to get there from the Spike to the Jetty. The road is a little rough, but most cars should be able to make it as long as you take it easy.

Given the time, distance, and remoteness involved in this Photowalk, everyone is encouraged to pack water and snacks.

Hope to see you at one of these events!

More info on Spiral Jetty
Meeting location

Tuesday, April 7, 2009

World's first 2 day photowalk *

Evening Dunes
Wow! What a weekend!
  • 1600 miles
  • 1200 images
  • 48 hours
  • and best of all: 8 new friends
A couple months ago, Trevor Carpenter, a blog acquaintance, included me in an invitation to meet-up in Death Valley for an extended photowalk. I replied with a tentative maybe. This spring was looking to be pretty busy with travel and I didn't know if I could get one more trip in. A week before the event, I made the final decision to go. And I am glad I did.

Thursday, my wife picked up a rental SUV to give us off-road capability and we headed out early Friday morning. We arrived at the Furnace Creek Visitors Center about 3pm. After paying the entrance fee, getting a weekend pass and talking with the ranger for a bit to get the lay of the land, we headed out to the nearest town to get a room. We returned to the Visitors Center at 5:30pm to meet-up with everyone else. The last of us got there at 6:30pm and we set out to catch the sunset at Zabriskie Point. When we finished making as many pictures as we wanted, we headed to 49er Cafe for dinner and to make plans for the next day.

Saturday started dark and early for the 90 minute drive to our sunrise location, Dantes View. For various reasons, half the group didn't make it, so after sunrise we headed back towards the Visitors Center to attempt to make contact. (There was no cell phone service in the park, so we had to go old-school and actually leave written notes.)

On the way to the Center, we got side-tracked by 20 Mule Team Canyon, a cool little drive with big views of interesting formations. When we finally arrived back at the Furnace Creek area, we found one part of our missing company. Since the remaining missing members knew where we were going, we headed off to our next destination, hoping to meet the last of our jolly band. We found them half way there and we all headed off to Badwater Basin.

Following Badwater, we headed north to Natural Bridge, followed by Artists Palette and finishing the day with sunset at Devils Golf Course. Once it got dark, we headed over to 49er Cafe again for dinner and Sunday planning. After dinner, some of us headed over to Mesquite Flat Sand Dunes for some long-exposure night-time photography.

Everyone was tired from Saturday's schedule, so we planned an easier timetable for Sunday. We met again at 10:30am at Zabriskie Point to get a different light than the previous sunset time for this location. From here we went to a Harmony Borax Works, a historic location for processing borax in the late 1800s that had some interesting decaying adobe structures and rusting metal equipment. After lunch at Stovepipe Wells Villiage, we hiked up Mosaic Canyon and wrapped up the weekend with sunset back at the sand dunes.

I had a great time meeting and photowalking with all the attendees. You never know what to expect when meeting a bunch of strangers for the first time, but everyone was fun to meet and willing to share; a super group of people: Jan Bussey, Kristi Gray, Paul Wirtz, Joan Hunt, Mark (last name unknown), Trevor Carpenter (and his two kids Sarah and Tom), Diane Pebley, and me.

Thanks to Trevor for taking the initiative and putting this together and for everyone else for your part in making this a great event. And thanks to my local photography friends Rich Legg, Ed Paz, and Ann Torrence for generously letting me borrow some of their equipment.

Watch my Death Valley Flickr set for new images from this trip over the next week. Or check out this page to see everybody's images (if they get tagged properly).

* As far as I know anyway.